Making the box
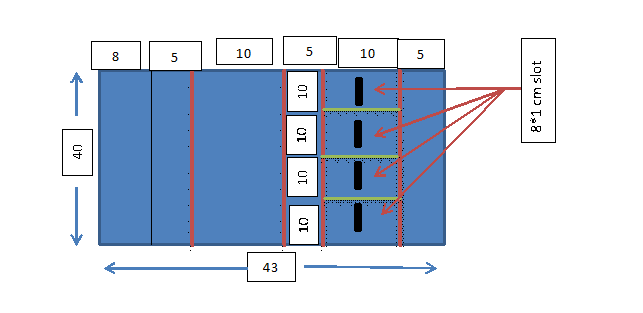
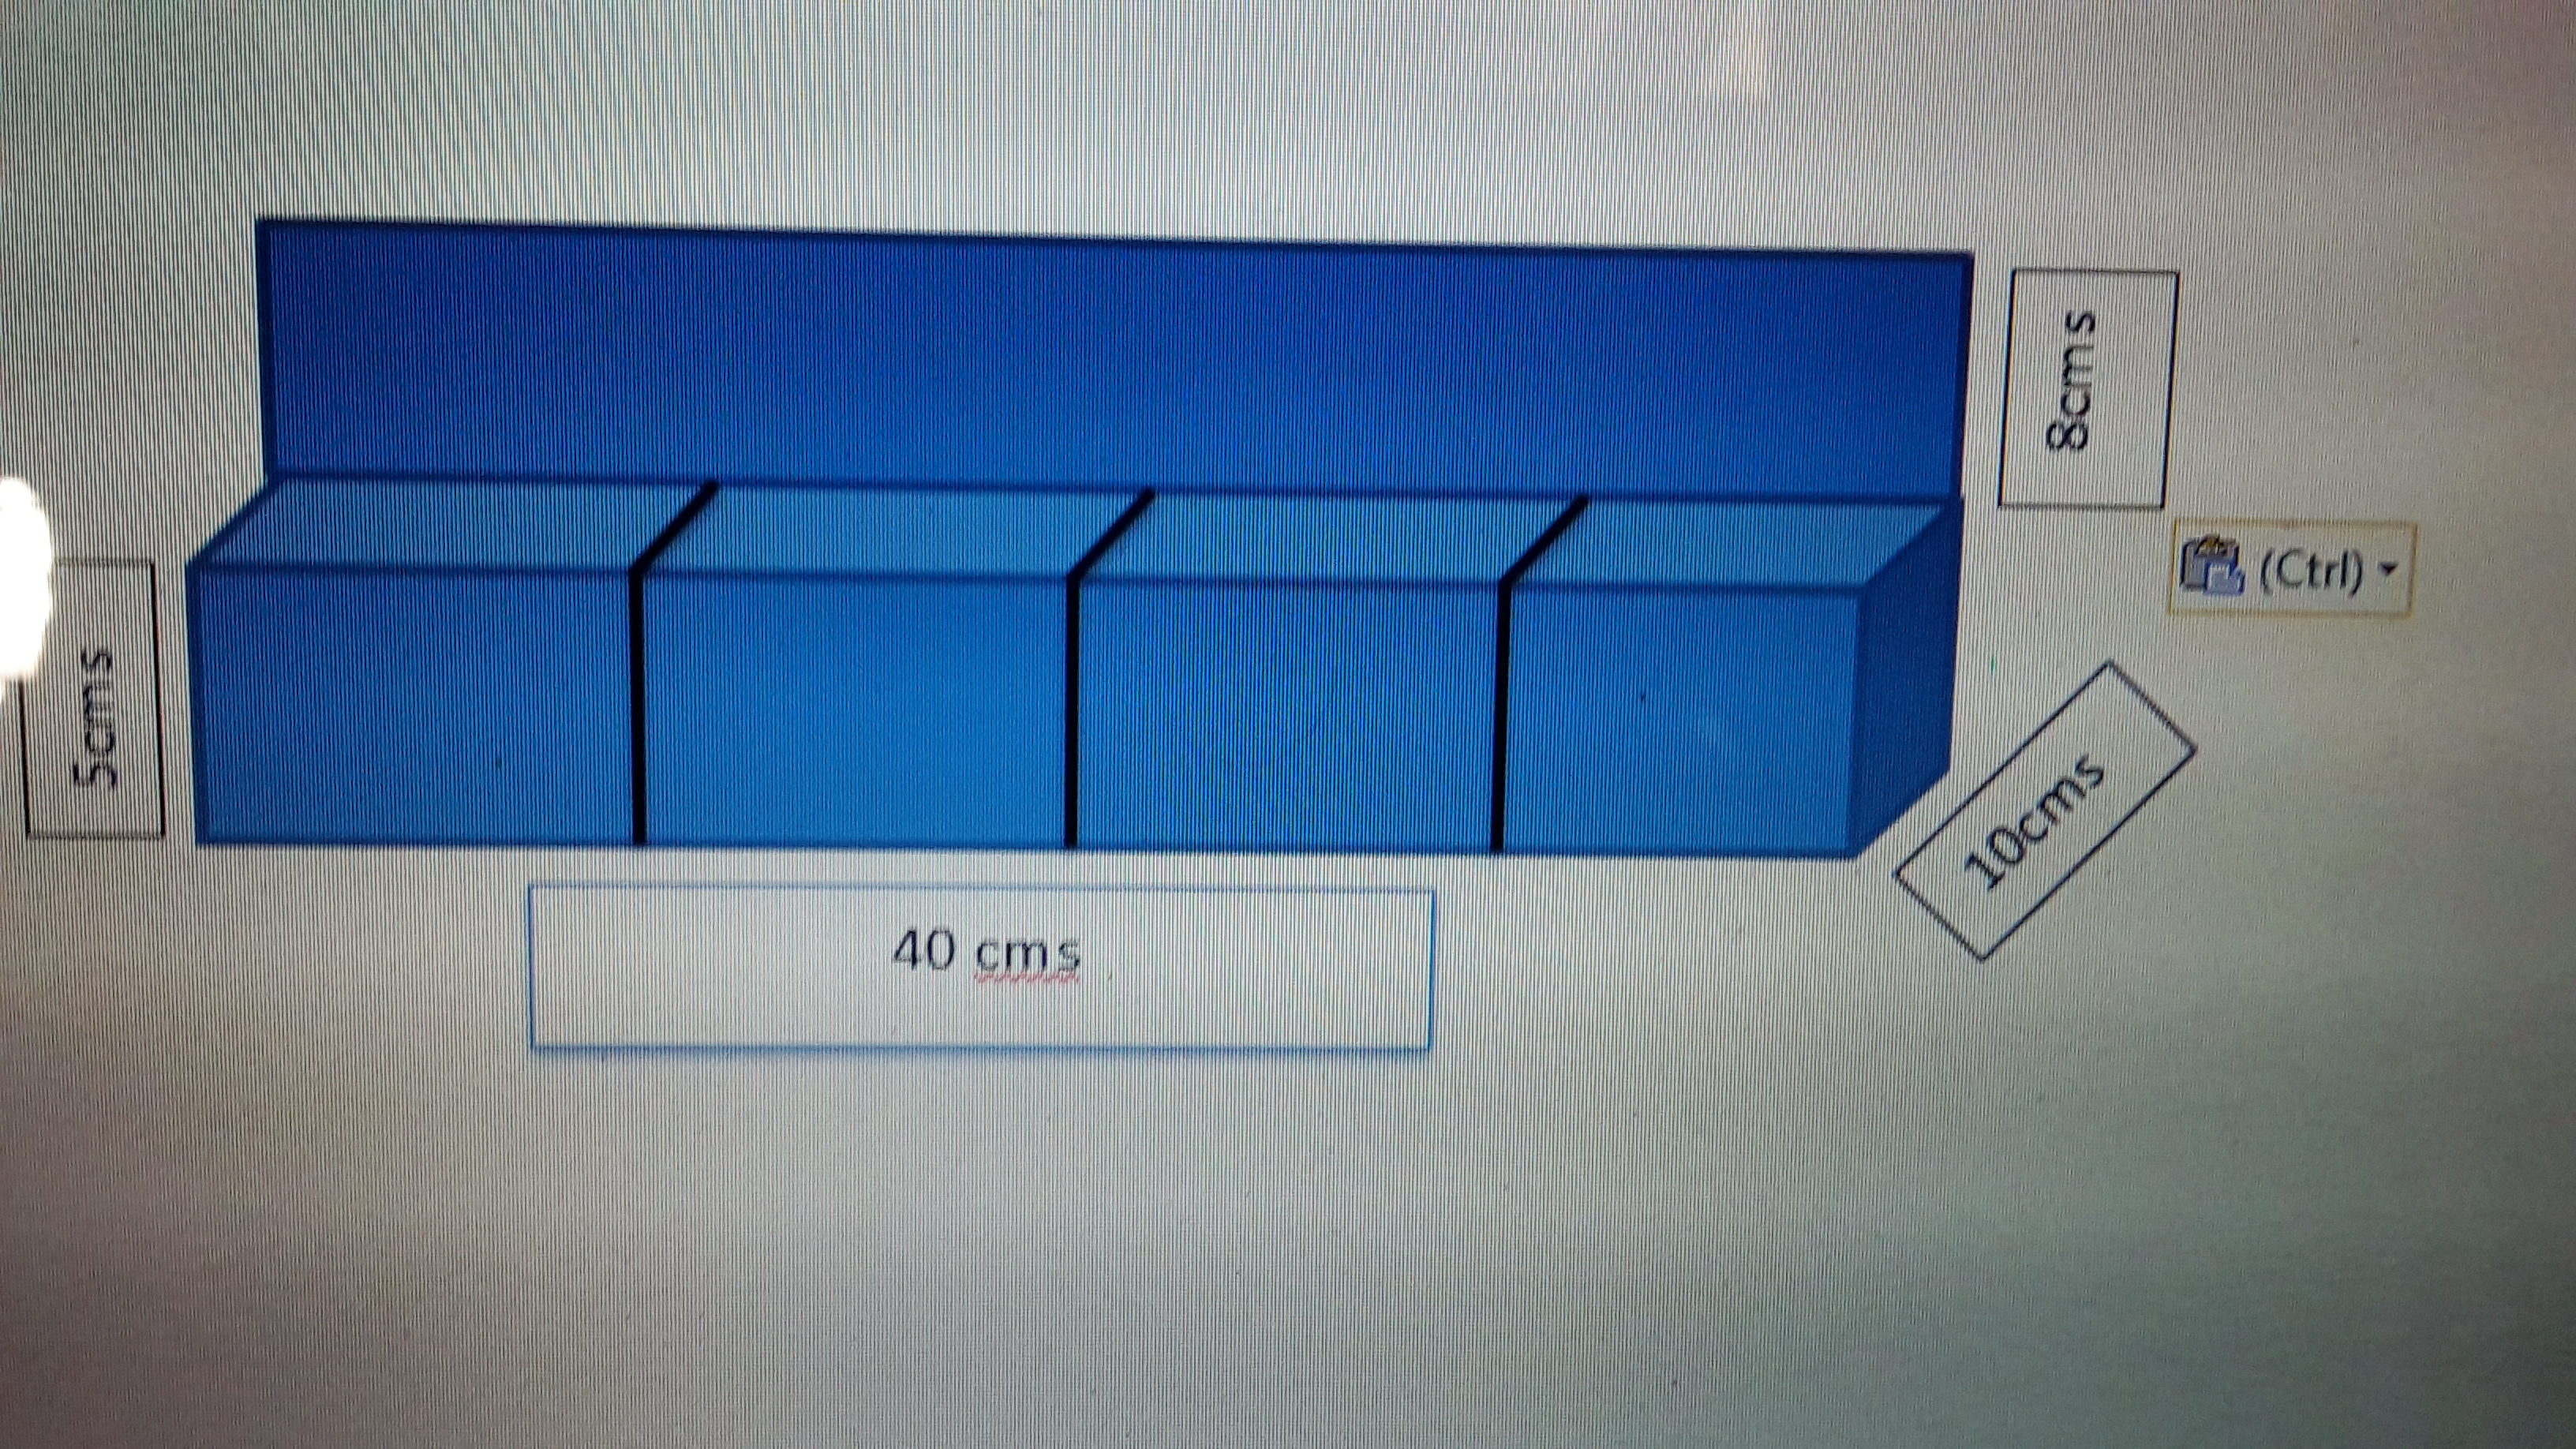
First make the box using 48*40 cm cardboard sheet. It should measure 10*5*40 cms. The upper flap is 8cms in height. Using a sharp cutter cut out slots that measure 8*1 cms. Do not glue the box yet. Once you are done with folding the box, cover it with fabric or printed paper taking care not to cover the slots or you can cut the fabric or printed paper through the slots later. The cards don’t go all the way down in the slots; they slightly peek out of the slots.
Refer pic below. The red lines need to be folded. The black line is NOT to be folded, that’s the flap of the box. All measurements are in cms.
For the inner part, use the cardstock sheet and glue the 3 cardboard pieces measuring 9.5*4.5 cms perpendicular to it. They should be 10 cms apart from each other. You can use this to store the cards when not in use.
For the sides, use the cardboard sheets measuring 11.5*7 cms. With 1 cm margins you make a rectangle measuring 9.5*5 cms. Fold over the blue lines. Attach the flaps to each other to make a tray. There will be 2 such trays. Stick 1 tray to one side of the box. It will close the box from one side.
The other tray needs to be attached to the cardstock sheet. Only the bottom flap of this tray (9.5cm) will be stuck on the cardstock piece.
You can make a handle with a string attached to this tray to pull out the cardstock sheet from the box.
Add a stand (7*25 cms cardboard sheet) at the back of box to hold the sets. Just glue the base part of the cardboard piece to the back of the box.
Printing & Lamination
Click here to go to folder Classification Box. There are 2 folders namely “Images” & “Printables” & some pictures of the box that I made.
‘Images’ has all the downloaded images under each category. It’s just for your info.
‘Printables’ is the actual folder where u need to take out prints
There are 14 files under ‘printables’ folder. Print these on A4 sheets & cut up each image. Except file no 001 laminate these images (A4 lamination sheets) by placing the images slightly apart from each other. After lamination, cut them up and round off the edges. Each image after lamination is roughly 7.5*7.5 cms square. Approximately 10 lamination sheets will be used if you are laminating them at home.
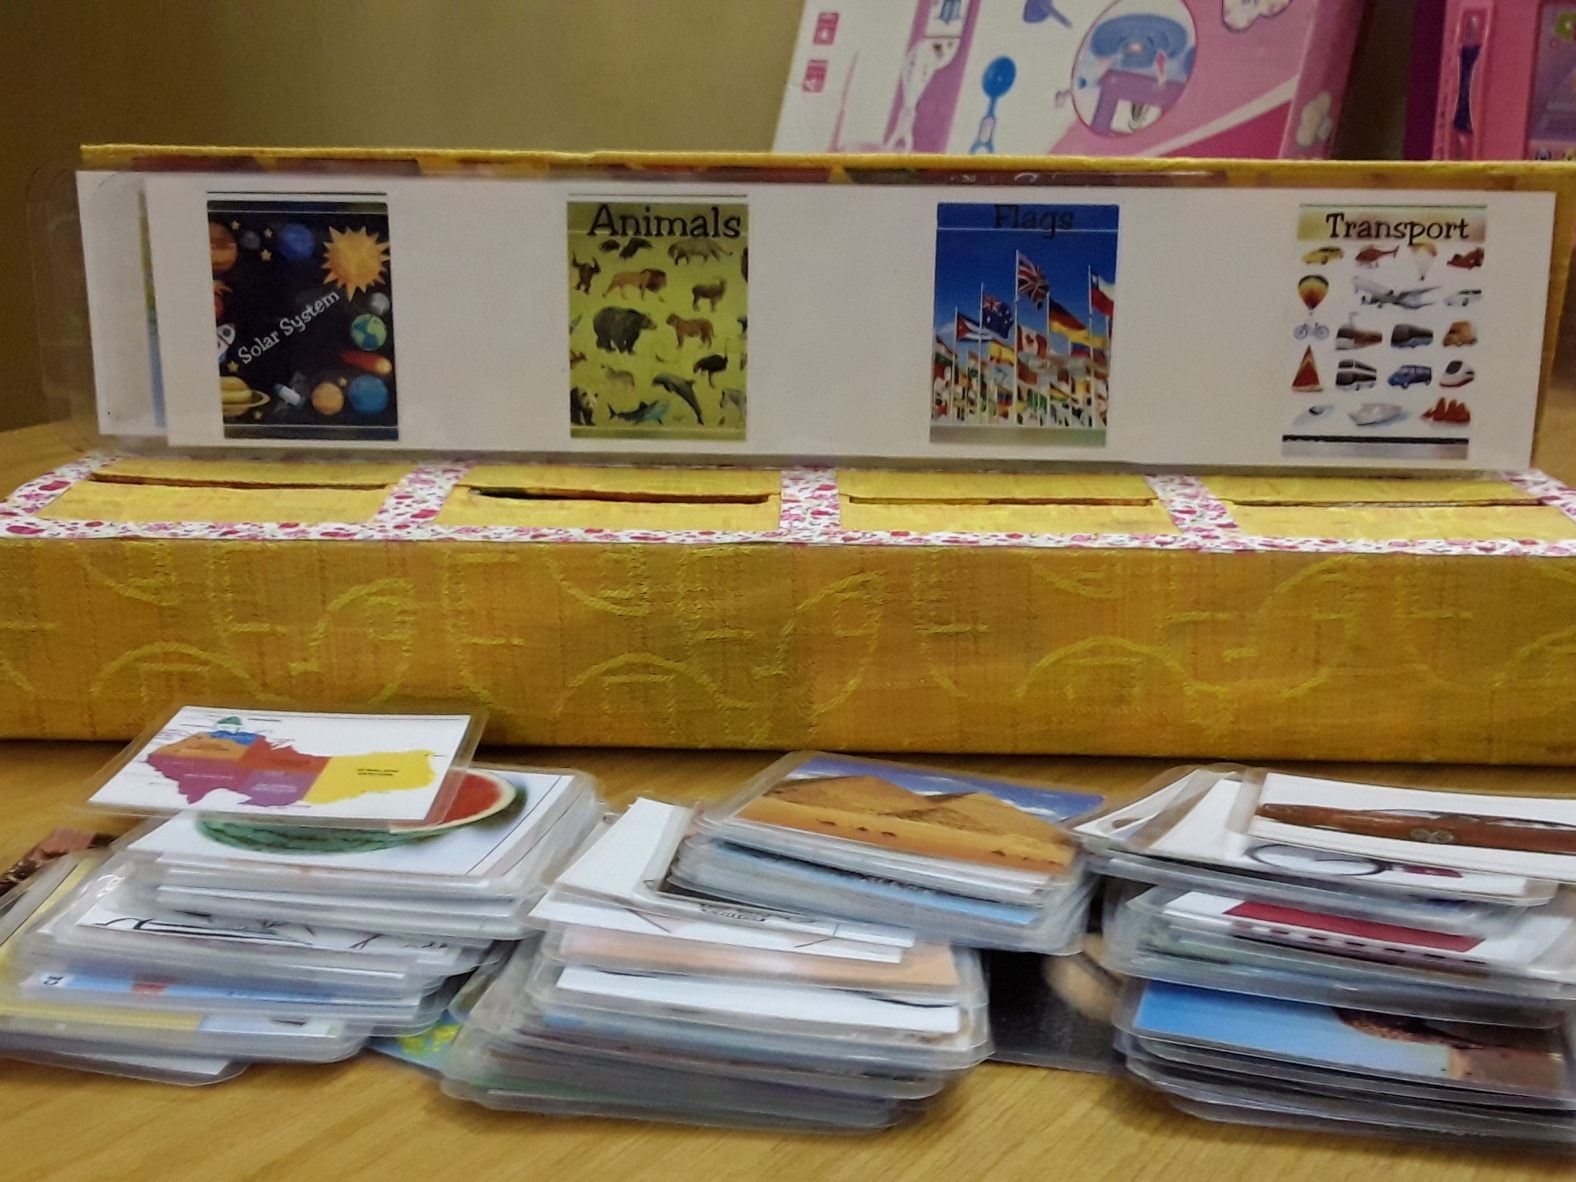
File no 001 is the categories. There are 4 categories in each set. Stick each image with equal distance between them on a card paper, measuring 38*6 cms. Laminate these sets on A3 lamination sheets. So it has a margin of 1cm on each side to make it 40*8cms. Only 1 A3 lamination sheet is needed. Cut it up and round off the edges.
And done! Classification box is ready! Play with your kids! You can always add the categories to suit your kid’s age and intellect.
Materials Required:
Cardboard sheet 43*40 cms to make the box
Cardboard sheet 7*25 cms to make the stand for the sets
2 Cardboard sheets measuring 11.5*7 to make the sides
3 cardboard sheets measuring 9.5*4.5 cms for the inner tray
1 cardstock or cardboard sheet measuring 9.5*40 cms for the inner tray
3 cardstock sheets measuring 38*6 cms for the sets
Fabric or printed paper to cover your box
A4 Lamination sheets – 10 (if laminating at home)
A3 Lamination Sheet – 1 (if laminating at home)
Glue, scissors, scale, pencil, cutter
How to play:
First, sort out all the cards according to the 3 sets. So you have 3 stacks of cards. Now ask your child to select one set and shuffle all the cards of that set. Pile up all the cards & ask your child to pick one card. The child has to identify and put the card in the correct slot. For eg; if the card is showing Pyramids then the child needs to say “pyramids” and put it through the slot under “Wonders of the World”. If you have 2 or more kids then they can take turns to pick the cards.
Aim:
It is said that children learn better visually – they remember quicker when they see pictures while reading or hearing new concepts. Therefore our goal here is to incorporate visuals and images of things, places etc. to enhance their grasp and memory while bringing an element of fun into everyday learning.
About me:
My name is Khushbu Sheth. I hold a degree in Home Science with specialization in Nutrition & Dietetics. I worked as a nutritionist for a few years and now I’m a full-time mom with 2 kids. I’m a DIYholic if there can be one! I love cardboards, papers, scissors & everything crafty. I’m totally glued to the Montessori Method of learning. Slowly but surely I’d like to make home-learning for my girls to be totally Montessori led.